
FortiGate Automation Stitch for Admin User Alerts
Enhancing FortiGate Security: Automation for Admin User Alerts
One critical aspect of maintaining a robust security posture is closely monitoring administrative activities. That includes the creation and updates of any admin users on your FortiGate devices. Since these will typically sit at the edge of your network, leaving them unmonitored can introduce significant security risks, potentially leading to unauthorized access or misuse of network resources.
In this guide, let’s walk through setting up a custom automation stitch on your FortiGate to automatically detect and alert you whenever a change is made to any admin user. This takes a proactive approach to ensuring you are immediately aware of such a critical change.
Why Monitoring Admin Users Matters
Super Admin accounts have the highest level of permissions on your FortiGate, making them prime targets for malicious actors. Any change to an admin account, whether legitimate or not, warrants immediate attention and verification though. By automating alerts for these, you’ll be able to quickly identify and investigate suspicious activities.
The Key: FortiOS Log IDs 44547, 44548, and 44560
FortiGates can generate an insane amount of detailed logs for just about any type of event. To monitor for changes of our admin users though, we’ll be looking for FortiOS logid 44547, 44548, and 44560. These log IDs are triggered when admin user configuration changes occur, and act as our digital tripwire.
| Log ID | Description | Why It Matters |
|---|---|---|
| 44547 | Admin user created | Detects when a new admin (including Super Admin) account is added. |
| 44548 | Admin user modified | Detects when existing admin credentials, permissions, or profiles are changed (e.g., privilege escalation or password change). |
| 44560 | Admin profile created/modified | Detects changes to the role definitions (i.e., if someone modifies the “super_admin” profile to weaken restrictions). |
Implementing Our Custom Automation Trigger
Creating the Trigger
To start, let’s create our Automation Stitch Trigger:
-
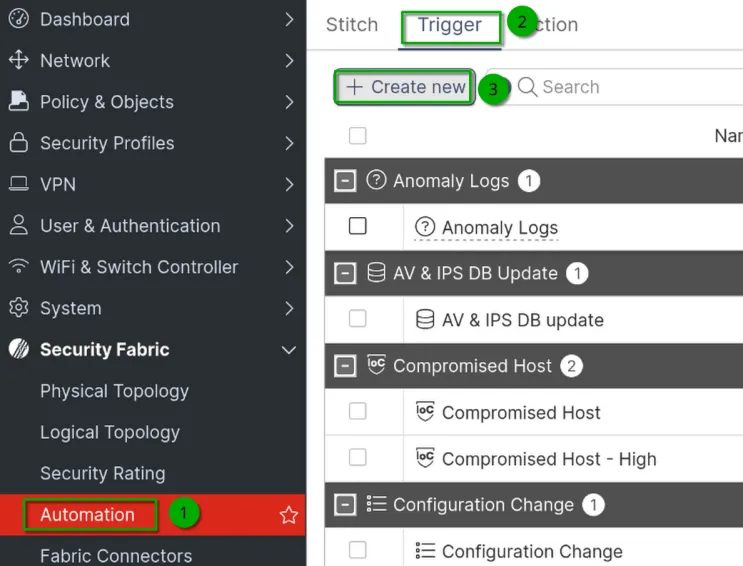
Go to Security Fabric > Automation.
-
Under the “Trigger” tab, click on Create New.
-
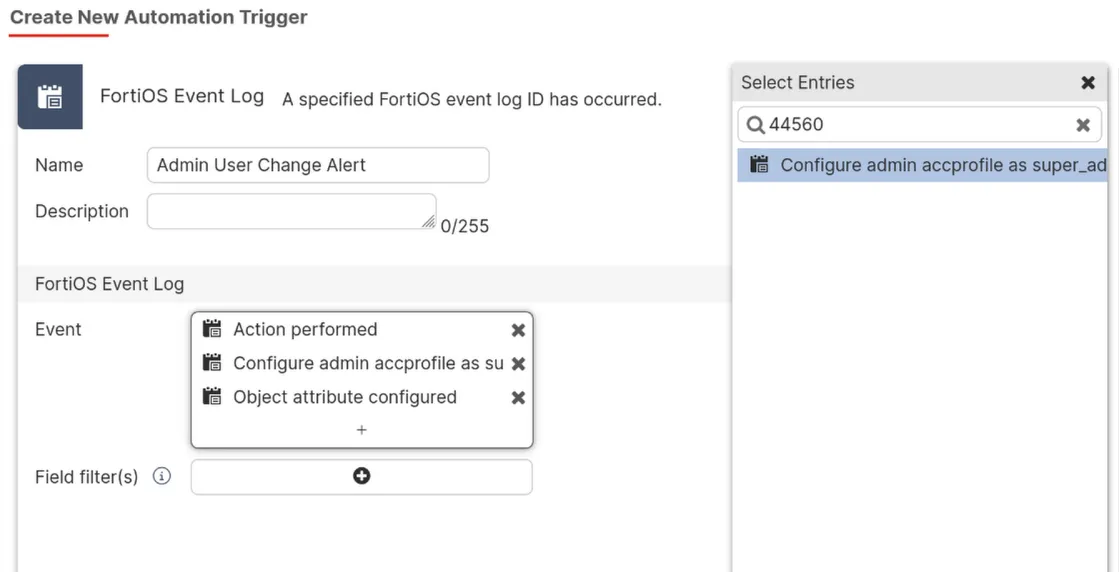
Provide a clear and descriptive name for your trigger, such as “Admin User Change Alert.”
-
For the “Event” type, select “FortiOS Event Log,” then specify the multiple Log IDs 44547, 44548, and 44560.
The easiest way to find these is to just search for the Log ID directly, so ‘44547’, etc. and add each one.
-
We could easily add more descriptive filters if looking for specific events. To cut down on the noise this automation will make it would make sense to filter on a specific type or subtype of event but the log ID is sufficient for now. There are also other Log IDs we could add if we wanted to expand on what we’re alerted about. I highly recommend checking out the FortiOS Log Message Refernce here to help fine tune what alerts you’ll receive.
-
Save your newly configured trigger.
Defining the Action
Now that our trigger is in place, the next step is to define what action should occur when this trigger is activated.
For example, you could configure the stitch to:
-
Send an Email: Immediately notify your security team or designated administrators via email about the creation of a new admin user.
-
Execute a Webhook: Integrate with an external monitoring system, Security Information and Event Management (SIEM) platform, or ticketing system.
-
Run a CLI Script: Execute further diagnostic or response commands on the FortiGate.
For now let’s use a basic Email notification:
To set up the Action:
-
Return to Security Fabric > Automation.
-
Under the “Action” tab, click on Create New.
-
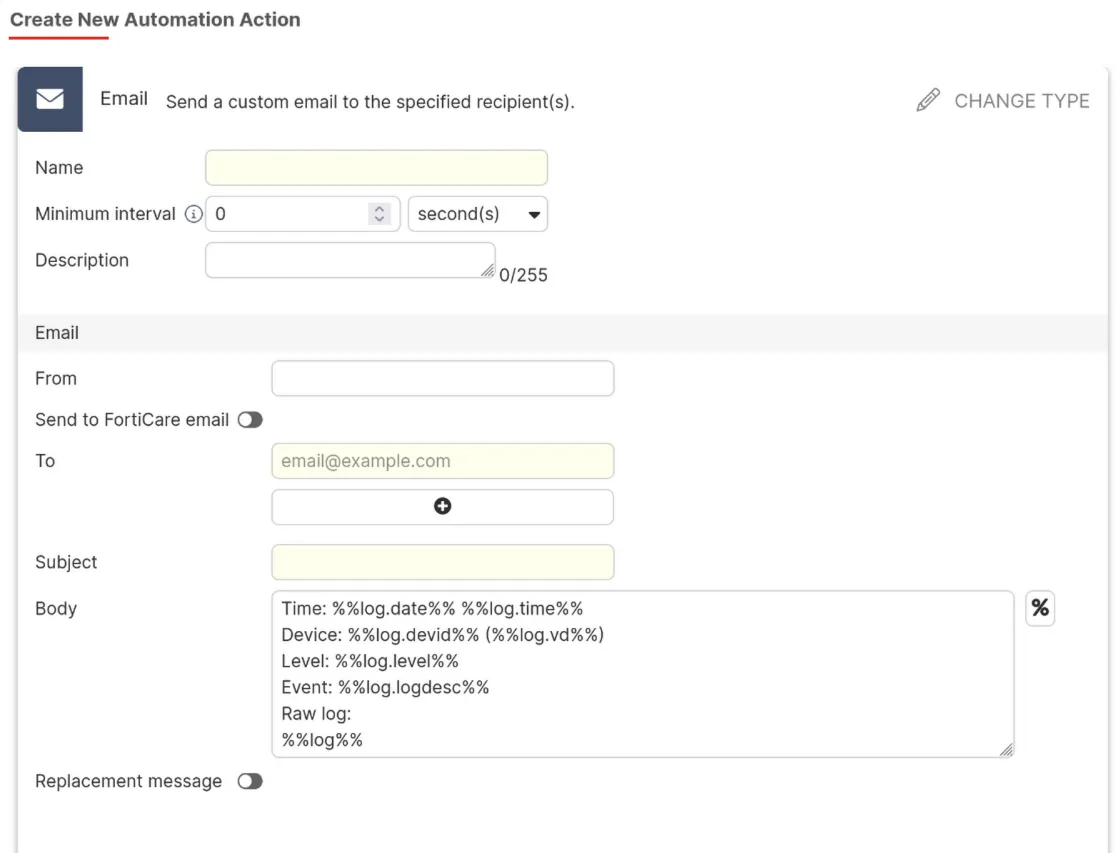
Select “Email” for the notification”.
-
Configure the specific details for your email action (e.g., recipient email address, subject line, message content). Some information should be predefined for you in the “Body” of the action.
- Then Save the new action.
Putting it all together
Last but not least, we’ll need to combine our Trigger and Action in an Automation Stitch
-
Navigate to the Security Fabric > Automation > Stitch tab.
-
Click on Create New.
-
Provide a name, and description if you’d like, and select our previously created Trigger and Action. Then click “Ok”.

Conclusion
By implementing real-time alerts for admin user activity we’re significantly enhancing our FortiGate’s security monitoring capabilities. As I mentioned this may take some fine tuning using filters to help cut down on the number of alerts you’ll receive. Refer to the FortiOS Log Message Reference here to see what filters you can apply.
← Back to blog